How to Build a Chrome Extension? What are they?
A Chrome extension is a web app made with HTML, CSS, and JavaScript. With a basic popup example you are making a mini website with web dev technologies.
I dove into the world of building chrome extensions by building a basic extension as a weekly project. Checkout the extension I made: Play a New Game on Chess.com:

So what are browser extensions? You probably use one, and we have all seen them.
Some of the popular extensions that I use are: Grammarly, Honey, and Lastpass.
A browser extension enhances the web page or the browsing experience in some way or form.
My first browser extension, Hide YouTube End Cards, simply removes the end hover cards from every YouTube videos. That's an example of a browsing enhancement.
Recently I wanted to learn how to build chrome extensions to build some SaaS products, so I took an interest in the topic.
Instead of going into tutorial hell, I built a real extension so that I could learn by dealing with real-world problems.
So here let me walk you through building a very basic Chrome extension:
Step 1 - Create a Manifest file
A browser extension is like an app. A manifest file is there to host the metadata of that app. A chrome extension needs a manifest.json where you will declare all the app info, extension pages, permissions, and data.
{
  "name": "Tamal's demo extension",
  "version": "1.0.0",
  "manifest_version": 3
}
The above are the three required keys of a browser extension.
All the keys are self explanatory, you are specifying the extension name, version, and the manifest version of this application. As of writing this article, manifest version 3 is the current standard for all browser extensions.
A browser extension without content is not useful, so let's create a page for it.
Extensions can display content in many ways. The simplest way to do this is to create a popup page. A popup is when you click on the extension icon, and a menu shows up.
In this example, you will create a basic popup with HTML, and CSS.
Step 2 - Create a popup.html
Under your project root, create a new file called popup.html
This file could be named anything; you can even call it index.html or whateever.html but since you will build more such system pages in the future, it's good to follow the convention.
Enter the following code into your popup.html file:
<html>
  <body>
    <h1>Demo Extension!</h1>
  </body>
</html>
As you can see it's a very basic HTML page with an H1 tag. You are free to write the full boilerplate with <!doctype html> but since I am following the official docs, I saw that the bare minimum code works.
Now that you have the popup content, it's time to hook this into the manifest file.
Update your manifest.json with the following code:
{
  "name": "Tamal's demo extension",
  "version": "1.0.0",
  "manifest_version": 3,
  "action": {
    "default_popup": "popup.html"
  }
}
The action key lets you create a new browser extension action. This time you are telling chrome to open a default popup, and which page to show as your popup.
Now that you have wired things up, let's test it.
Step 3 - Load Your Browser Extension Locally
Now that you have a barebones extension ready, it's time for you to test this extension on your Chrome browser.
Go to chrome://extensions page on your Chrome browser and enable the Developer Mode toggle switch.

I am using the Google Chrome Developer Edition, but you can use the regular chrome as well.
When you enable the dev mode you will see a new set of buttons to load your development extensions:

Click on the Load unpacked button and load the entire project folder you have been working on so far.
Make sure to pin this extension so it will be easy to iterate as you build.

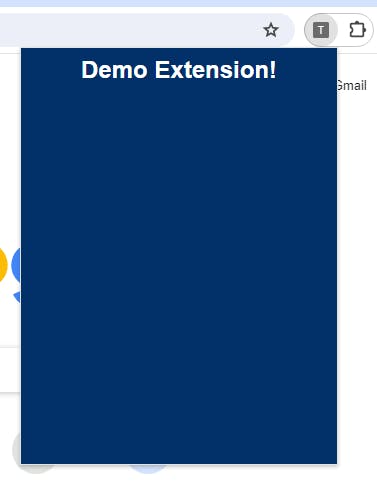
Now when you click on the extension icon, a default popup will show up as your extension page.

Many chrome extensions use this popup for their main user interface or the settings page.
Now, up until this point you have built a very basic and boring chrome extension.
So where's the good stuff?
The fun begins when you add custom CSS and JavaScript to enhance its look and functionality.
You can link to your CSS and JS the same way you would do with just any other HTML page:
<html>
  <head>
    <link rel="stylesheet" href="style.css">
  </head>
  <body>
    <h1>Demo Extension!</h1>
    <script src="script.js"></script>
  </body>
</html>
I added an empty script.js file and a style.css CSS file with the following styles:
body {
  font-family: Arial, Helvetica, sans-serif;
  background: rgb(2, 49, 105);
  color: #fff;
  width: 300px;
  height: 400px;
  text-align: center;
}
After that the browser popup looks like this:

You can use JavaScript to add forms, event handlers, and even fetch some data from an API to display on your popup page.
That's pretty cool!
But as a React.js developer, I want to make use of modern build tools and React superpowers.
So I found out about the Plasmo framework. It lets you streamline the extension-building process.
Using Plasmo and React, I built this chrome extension for chess.com. This one solely uses the popup action and nothing else.

In one of my future articles, I will share how I built this extension with Plasmo and React.
As I learn more about chrome extension APIs I will build and share them with you in this blog.
Feel free to check out my extension here.
If you need the full source code of the demo extension you built today, here it is.
